
Chocolate is a truly magical ingredient. Not only is it a powerhouse of flavour, it also pairs beautifully with other ingredients to make something incredible. Chocolate isn’t one note, mind; from the heady richness of an intense dark chocolate to the nostalgic creaminess of milk chocolate and the often maligned simplicity of white chocolate, it can be the star of the show or simply the supporting act. Chocolate can do it all.
Dinner party cake, AKA double baked flourless chocolate cake (pictured top)
This is my go-to dinner party dessert. It’s simple, can be made ahead, and is guaranteed to go down a storm. The cake batter is a pretty classic flourless one; the difference lies in the method used to bake it. Half is baked as usual, then the remaining batter is added on top. The cake then gets a brief second bake, just until the crust is set. The top layer remains as light and airy as a chocolate mousse while the bottom layer is closer to a fudge brownie. Because this is a flourless cake, it also happens to be gluten-free. Take the dessert to the next level and serve in a puddle of nutmeg-infused creme anglaise.
Prep 10 min
Cook 1 hr 10 min
Chill 6 hr+
Serves 8–10
For the flourless chocolate cake
250g unsalted butter, diced, plus extra for greasing
250g dark chocolate (70-80% cocoa solids)
6 large eggs, separated
120g light brown sugar
120g caster sugar
¼ tsp cream of tartar
¼ tsp fine sea salt
For the nutmeg creme anglaise
300ml whipping cream
300ml whole milk
1 whole nutmeg
6 large egg yolks
1 tsp vanilla bean paste
100g caster sugar
To serve
Cocoa powder
Heat the oven to 180C (160C fan)/350F/gas 4. Lightly grease a 20cm round springform cake tin and line the base and sides with baking parchment.
Melt the chocolate and butter in a bain-marie or glass bowl set above, but not touching, a pan fill of simmering water, then remove from the heat and set aside to cool slightly. Put the egg yolks and brown sugar in a large bowl set over a pan of simmering water and, using an electric hand mixer, whisk for two to three minutes or until the mixture is pale and thick. Remove the bowl from the heat, pour in the chocolate mixture and fold together to combine.
Working quickly, wash the beaters of the mixer. Put the egg whites, caster sugar, cream of tartar and salt in another large bowl and whisk until the meringue holds soft peaks. Fold a third of the meringue into the chocolate batter, then the remainder in two additions, folding gently until the mixture is streak-free.
Pour half the batter into the prepared tin, spreading gently into an even layer, and bake for 25–30 minutes or until risen and domed on top. Remove and leave to cool for 10 minutes. During this time, the centre of the cake should cave in on itself a little. If it stays level, use a spoon to compress the cake lightly, creating a slight well. Scrape the remaining batter over the cake, gently spread into an even layer and bake for 15 minutes. The top layer will remain very soft but it will have formed a thin crust. Leave to cool to room temperature before transferring to the fridge for at least six hours, but preferably overnight.
To make the creme anglaise, pour the cream and milk into a saucepan. Grate about a third of a single nutmeg into the pan, stir to combine, then bring the mixture to a simmer over a medium heat.
Meanwhile, put the egg yolks, vanilla and sugar in a mixing bowl and whisk until pale. Pour over the cream mixture, whisking as you do, to prevent the eggs from scrambling. Pour the custard back into the saucepan, put over a low heat and cook, stirring constantly, until the custard thickens enough to coat the back of a spoon. To ensure the custard is fully cooked it needs to reach between 75C and 80C on a thermometer. Pour the custard into a jug, cover with clingfilm to prevent a skin from forming, and refrigerate until thoroughly chilled – at least two hours. You can also serve the custard warm, but I absolutely love it cold.
To serve, carefully un-mould the cake, very gently peel away the parchment from the sides, and dust with cocoa powder. To get the cleanest slices, dip a knife in very hot water, wiping it dry with a kitchen cloth after each slice. Serve the slices in a puddle of the crème anglaise. The cake can be refrigerated for up to three days.
Blueberry tarragon white chocolate cheesecake tart
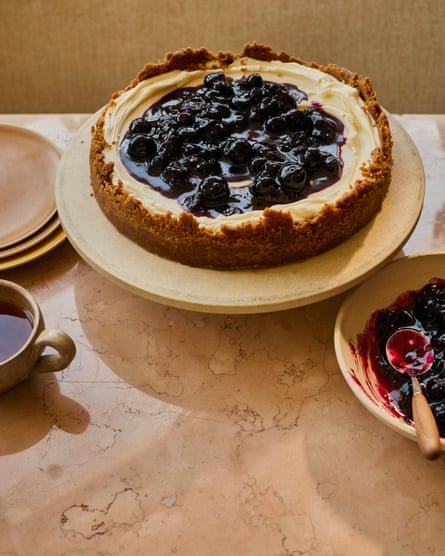
When I need a simple crowd-pleasing dessert, a no-bake cheesecake fits the bill perfectly. This white chocolate version uses Biscoff biscuits for a toasty, almost caramelised flavour in the crust and it is topped with a blueberry compote infused with a little tarragon for a beautiful herbal aniseed flavour.
Prep 15 min
Cook 40 min
Serves 10–12
For the biscuit base
250g Lotus Biscoff biscuits
125g unsalted butter, melted and cooled
½ tsp flaked sea salt
For the white chocolate cheesecake
150g white chocolate, finely chopped
115g full-fat cream cheese
115g mascarpone
125ml whipping cream
1 tsp vanilla bean paste
For the blueberry and tarragon compote
350g blueberries
50g caster sugar
Juice ½ lemon
2 tbsp finely chopped fresh tarragon
1 tbsp cornflour
For the biscuit base, finely crush the Biscoff in a food processor or by putting the biscuits in a freezer bag and beating with a rolling pin until finely ground. Tip the crumbs into a bowl, add the butter and salt and stir until throughly combined. Tip the mixture into the base of a 23cm loose-bottomed tart tin and spread, gently pressing it into an even layer. Use a flat-bottomed glass to compact the crust across the base and up the sides of the tin, then refrigerate while you make the cheesecake.
Put the chocolate in a small bowl and melt, using either a microwave or in a bain marie or glass bowl set above, but not touching, a pan of simmering water, then set aside for about 10 minutes until cool but still fluid. Put the chocolate and all of the remaining cheesecake ingredients in a large bowl and whisk until thick and holding soft peaks. Scrape atop the biscuit base and spread into an even layer.
To make the compote, put 250g of the blueberries, the sugar, lemon juice and tarragon in a saucepan, along with 50ml water and bring to the boil over a medium heat. Once at a rolling boil, cook for three to four minutes, until the fruit is starting to break down and the liquid is slightly reduced.
In a small bowl, whisk together the cornflour and two tablespoons of the liquid from the pan. Pour this slurry into the saucepan and cook, stirring constantly, for a further minute or until you have a jam-like consistency. Scrape the compote into a bowl, cover, and refrigerate until needed.
When ready to serve, remove the compote from the fridge and stir through the remaining blueberries. Spoon on top of the cheesecake, spreading over most of it, but leaving a small border around the edge. Kept refrigerated, the cheesecake will keep for up to two days.
Double chocolate olive oil cookies
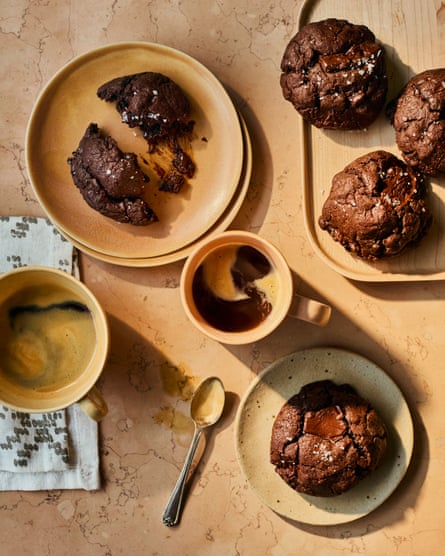
If you are partial to a brownie, you’ll love these intensely chocolatey, fudgy cookies. They may look nostalgic, but the olive oil, nutty rye flour and generous sprinkling of salt give them a sophisticated flavour. Your choice of oil will determine the end flavour of the cookies. If you use a lightly flavoured olive oil, the flavour will be very subtle, dominated by the cocoa and chocolate. For a more prominent flavour, use an olive oil with a pronounced fruity flavour that will pair well with the chocolate.
Prep 10 min
Cook 30 min
Makes 8
5½ tbsp soya milk, or other non-dairy option, or cow’s milk if you don’t need them to be vegan
40g cocoa powder
100ml olive oil
185g light brown sugar
140g plain flour
75g wholemeal rye flour
½ tsp bicarbonate of soda
½ tsp fine sea salt
150g dark chocolate, roughly chopped
Flaked sea salt, for sprinkling (optional)
Heat the oven to 180C (160C fan)/350F/gas 4 and line a large baking tray with baking parchment.
Pour the milk into a saucepan and bring to a simmer. Meanwhile, put the cocoa in a mixing bowl. Pour the hot milk into the cocoa, whisk to form a paste, then pour in the oil and whisk again to combine. Sift in the light brown sugar and whisk to combine. Add the remaining dry ingredients and, using a spatula, mix to form a thick cookie dough. Add the chocolate and stir to distribute evenly.
Divide the dough into eight equal portions and roll each piece into a ball. The dough can feel a little oily, but don’t worry, that’s how it should be at this stage. Space out the balls on the prepared tray and sprinkle each with a little flaked sea salt, if using.
Bake for about 16 minutes. The cookies will remain very soft in the centre, with just a little firmness at the edges, but as they cool they’ll firm up beautifully to give a dense, fudgy texture. Once fully cooled, the cookies can be stored in a sealed container for three to four days.
Matcha marble cookies
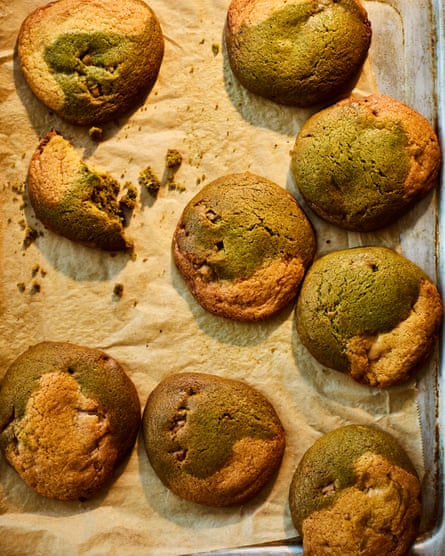
If matcha and white chocolate are a match made in heaven, then surely using caramelised white chocolate would amp up the flavour even more? The toasty flavour of the roasted chocolate adds a hint of caramel and a little more depth than a classic white chocolate and matcha combination. To make these cookies a bit more fun, and give them an exciting visual appeal, the dough is split in half and the matcha added to just one of the halves. The two doughs are then rolled together, giving the cookies a marbled effect. If you don’t want to bake the cookies all at once, freeze the balls of dough. They can be baked from frozen, but will need an additional one to two minutes cooking time.
Prep 5 min
Chill 4 hr
Cook 50 min
Makes 16
200g unsalted butter, room temperature
125g light brown sugar
125g caster sugar
2 large eggs
1 tsp vanilla extract
375g plain flour
1 tsp baking powder
1 tsp bicarbonate of soda
1 tsp fine sea salt
2 tbsp matcha powder
2 tbsp whole milk
185g caramelised white chocolate discs/fèves, or a roughly chopped bar
Put the butter and sugars in the bowl of a stand mixer and beat with the paddle attachment until light and fluffy – about five minutes. Add the eggs one at a time, beating until fully combined before adding the second. Add the vanilla and beat briefly until combined.
In a separate bowl, whisk the flour, baking powder, bicarb and salt. Add the flour mix to the butter mix and combine on low speed, just until a uniform cookie dough is formed.
Divide the dough into two equal portions. In a small bowl, whisk together the matcha and milk to make a paste. Add this to one of the cookie dough portions, mixing until thoroughly combined. Divide the chocolate between the two portions of dough and mix until evenly distributed. Cover each portion of dough and chill for four hours or until firm.
Heat the oven to 180C (160C fan)/350F/gas 4 and line two large baking trays with baking parchment.
To form the cookies, roll each portion of dough into 16 equal-sized balls. Take one ball of matcha dough and one ball of the plain dough and squash them together, rolling into a ball. Arrange eight balls of dough on each of the prepared trays and bake for 15–16 minutes, or until the edges are lightly browned but the centres still a little pale. Remove from the oven and leave to cool on the trays for five minutes, then carefully transfer to a wire rack to cool completely. Kept in a sealed container, these cookies will keep for up to four days.
My tips for cooking with chocolate
If you love baking with chocolate, then you know it can be an expensive ingredient. My biggest tip here is to skip the supermarkets; if you buy from a specialist chocolate company you’ll not only get significantly better quality chocolate, but it’ll often be cheaper than buying it by the bar. For example, Lindt is currently about £35 per kilogram yet my go-to chocolate for baking, Coucher de Soleil, from Guittard is £22.68 per kilogram.
Best chocolate to bake with
Guittard Coucher de Soleil 72% Dark Chocolate my go-to, a wonderful all-rounder
Pump St Hacienda Victoria 85% Dark Chocolate makes the most delicious chocolate pastry cream
Islands Chocolate 55% Milk Chocolate a rich milk chocolate that isn’t too sweet
Guittard Creme Francaise 31% White Chocolate a great white chocolate for baking
What to do if your chocolate seizes
Sometimes, a glossy bowl of melted chocolate can quickly seize into a grainy mess. This is usually because of the addition of a small amount of liquid, although it can also occur when the chocolate has been overheated. While you can’t rewind the problem, you can still use the seized chocolate – just not as you intended. To rescue it, a hot liquid (such as water or cream) needs to be added, a little at a time, until the mixture is smooth. I tend to use this rescued chocolate to make a sauce or glaze.
How to rescue a split ganache
When a ganache breaks or splits, yes, it’s a pain, but all is not lost: most of the time this is an entirely fixable problem.
Use force
A stick blender is not only my go-to piece of equipment when making a ganache, it is also my favourite bit of kit when rescuing a split one. If you previously opted to skip the blender in favour of using just a spatula, dig out one now. Put the ganache in a jug and use the blender to re-emulsify it, keeping the blades beneath the surface to avoid the mixture becoming aerated. If this remedy is going to work, you will see the ganache become shiny and smooth almost immediately.
Briefly heat
If the ganache begins to split as it starts to cool, another option is to briefly reheat it. Gently heat the ganache using a bain-marie or the microwave – you don’t want it to come to a temperature of more than 38C – then re-emulsify it by stirring, as above, with a spatula or blending briefly with a stick blender.
Add water
Yes, you read that right. Many people will have heard the advice that water and chocolate should never be combined, but that doesn’t apply here. In this instance, warmed water (you can also use warmed milk or cream) helps to re-emulsify the ganache. Add the liquid a teaspoon at a time and stir, using a balloon whisk or spatula, mixing until the ganache becomes smooth and perfectly silky. The downside to this technique is that it may change the texture of the ganache to the extent that it may no longer be appropriate for its original use. For example, if you were planning to make rolled truffles, the added liquid may mean that it now sets too softly.
What if you mess up when tempering chocolate?
I’m not going to lie: tempering chocolate can be tricky, and you may well mess it up occasionally. I still do, when I’m in a rush or get distracted. If you end up with un-tempered chocolate, let it set and then use it, as is, in any recipe where the chocolate is melted and mixed into other ingredients, such as brownies, cakes, even hot chocolate. You can also restart the process, using some extra tempered chocolate to act as the “seed”. Never throw it away: it will always be usable in some way.
-
This is an edited extract from Chocolate Baking by Edd Kimber, published by Quadrille at £28. To support the Guardian, order a copy for £25.20 at guardianbookshop.com (P&P may apply)